


In June, my sister Helen and her grandson Sam came with me on a visit to Gemstone Beach. I took 15 of Sam’s stones home with me to polish (see “Sam’s Stones“) and I also took a number of stones that Helen had collected. I used two three pound barrels to tumble their stones in 320 grit and then combined them in one four pound barrel to polish them in two grades of tin oxide. Altogether, I polished 104 stones for Helen:


In this series of Posts, I will describe how I take photos of stones and how I prepare the images for posting on TumbleStone. All the photos of stones used in the examples are from the batch I recently polished for Helen.
MY CAMERA
My small digital camera is a Sony Cyber-shot DSC-WX500 with a 30x optical zoom lens which I find quite good at shooting in low light conditions. I am able to take reasonable close-up shots with it – it has an automatic macro-setting that is said to be best at 5 cms distance. All the photos taken by myself that are posted on this Blog, of beaches and landscapes and stones, have been taken with this camera.


LIGHTING CONDITIONS FOR PHOTOS
The above photos of Helen’s stones were taken inside the shed where I do my tumble polishing. In fact, they were taken next to the sink where I empty the tumblers and wash the stones, away from any natural light. There is a small florescent tube light above the sink and two lights, with compact fluorescent bulbs, along the roof beam of the shed.


Generally stones look their best in direct sunlight, their colours and patterns and grains shown in a lively manner. However, the reflections off polished stones, even a reflection of the camera itself, can often interfere with good images. Sometimes the sun moving behind clouds makes the light conditions better and reduces reflections. Moving inside to low light conditions can eliminate reflections to a large degree (if there are no windows or other light sources nearby) but then any minor movement blurs the photo and the stone’s colour often looks more washed out. This could be overcome by mounting the camera on a tripod, but I have not yet done so. Different lighting conditions also highlight scratches and other “imperfections” in a stone in different ways.
Examples of photos of several of Helen’s stones under two different light conditions, inside the door of the shed and outside (the photos are as they came out of the camera):


The photo above left was taken inside the shed. The stone’s colour is slightly more washed-out compared to the photo above left taken outside the shed in dull sunlight. The reflections showing on the stone are different, with the light source(s) inside interfering less. The next stone is a layered grey mudstone:


In the photo taken outside the shed (above right), the shadowed reflection of the camera and photographer can actually be seen in the stone. The two photos of the jasper stone below also show the same issues with colour and reflection.


Below is a stone that is a little less shiny than the previous ones. The inside photo (left) is a distinctly different hue than the outside photo (right).


IN HAND
I often take photos of stones after a batch has just been polished, which means I may have anywhere between 40 and 70 to record. I might photograph only a selection, maybe the most interesting ones, but there are always quite a few to do. That is one of the reasons why I take photos of the stones in my hand – I can quickly move a stone closer to the camera if I wish, I can change the lighting conditions by moving the stone around or by going outside, and I can do a number of stones in a relatively short time (though it might still take 20 minutes or more).
PICASA
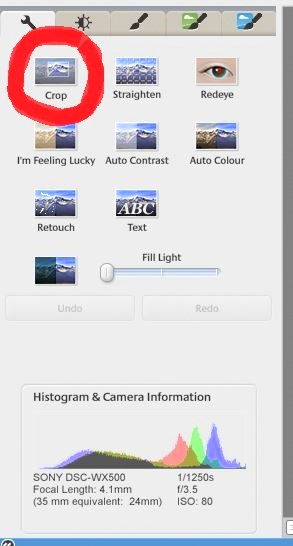
When I download the photos from my camera’s memory card onto my laptop, I open them in Picasa, an image organizer and image viewer for organizing and editing digital photos. Below is the “home” page when a photo is opened in Picasa. On the left is a kind of dashboard, with “Commonly needed fixes” (the spanner icon) selected. This shows options for “Crop”, “Straighten”, “Redeye” etc.


Google offered Picasa as freeware between 2004 and 2016, but then discontinued it. They replaced it with Google Photos. I am able to use Picasa still, but Google no longer offers support for it (not that I have ever needed such support). I will describe what I do with Picasa and I assume that other photo programs or services will be able to do similar things.
In the next section of this Post, I discuss how I use the “Crop” function then I will look at the use of the “Straighten” function. My use of other Picasa functions will be examined in the second Post in this series.
CROPPING
I crop photos of stones for three reasons – to balance the elements in the photo, to get a detailed enough image of the stone, and to “zoom in” very closely on the pattern, grain, colour and texture of the stone.
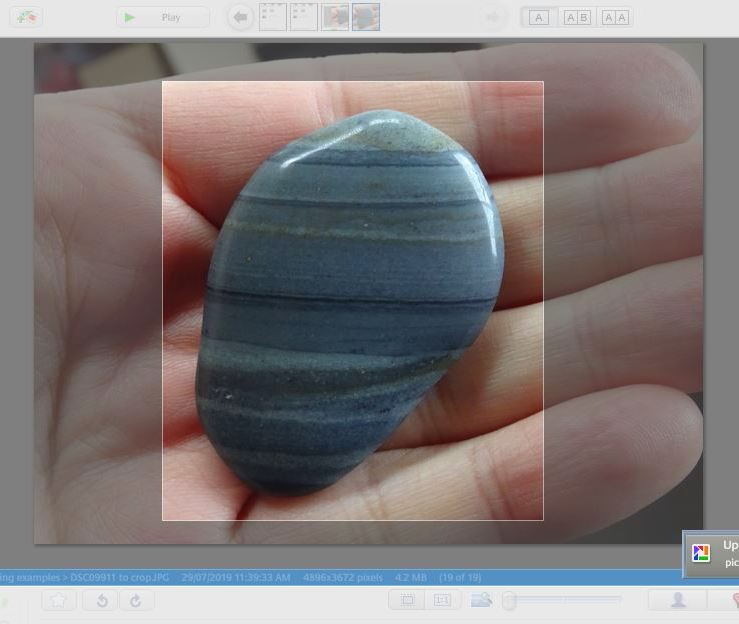
Here are three examples of progressive cropping of the image of a stone (click on them to view the full photos). The first image of each of the three (far left) is the original photo, the second is the cropping to reduce the edges around the stone to frame it for viewing, the third is a “close-up” of the majority of the stone surface, with the fourth “zooming in” more closely to provide even greater detail:


The main limitation of the most-cropped image (the far right ones) is the possibility of blurring if the focus was not very good originally. This can be off-set a certain degree by using the “Sharpen” option (see next Post).
STRAIGHTEN
Another option provided in Picasa is to “straighten” a photo. This is particularly useful for photos of beaches where you really want the horizon line to be as close to horizontal as possible. With this photo of the Back Beach at Riverton, the original photo (below left) was on an angle, but can easily be “straightened” (below right):


Picasa provides a bar along which the cursor can move an “indicator”. Grid lines are laid over the image so it is possible to line up a horizon with one of the horizontal lines of the grid. The main limitation is that you lose part of the edge of the image as you straighten it (it “zooms in” as it straightens).


“Straighten” can also be used to change the orientation of a photo of a stone if you want to move it around less than a 45 degrees rotation (the “rotation” function is below the image, just to the left of centre):

It can be useful to crop an image of a stone as close as possible to its edges to highlight the stone itself. But if the photo has the stone lying at an angle to the vertical or horizontal, the “rotation” function won’t help:


The “straighten” function allows a less-than 45 degree rotation of the stone, but at the cost of a proportion of the image:


The two end results – at left is the cropped non-straightened image, at right is the cropped straightened image. The latter is closer to the perpendicular so that cropping will end up with a “closer” view of the stone:


In Post Two of this Series [not yet available], I will look at the use of the “saturation” and “brighten” functions, which are crucial for the quality of the image of a stone.


One thought on “Helen’s Stones, and Taking Photos of Stones – Part One: Lighting, Cropping and Straightening”